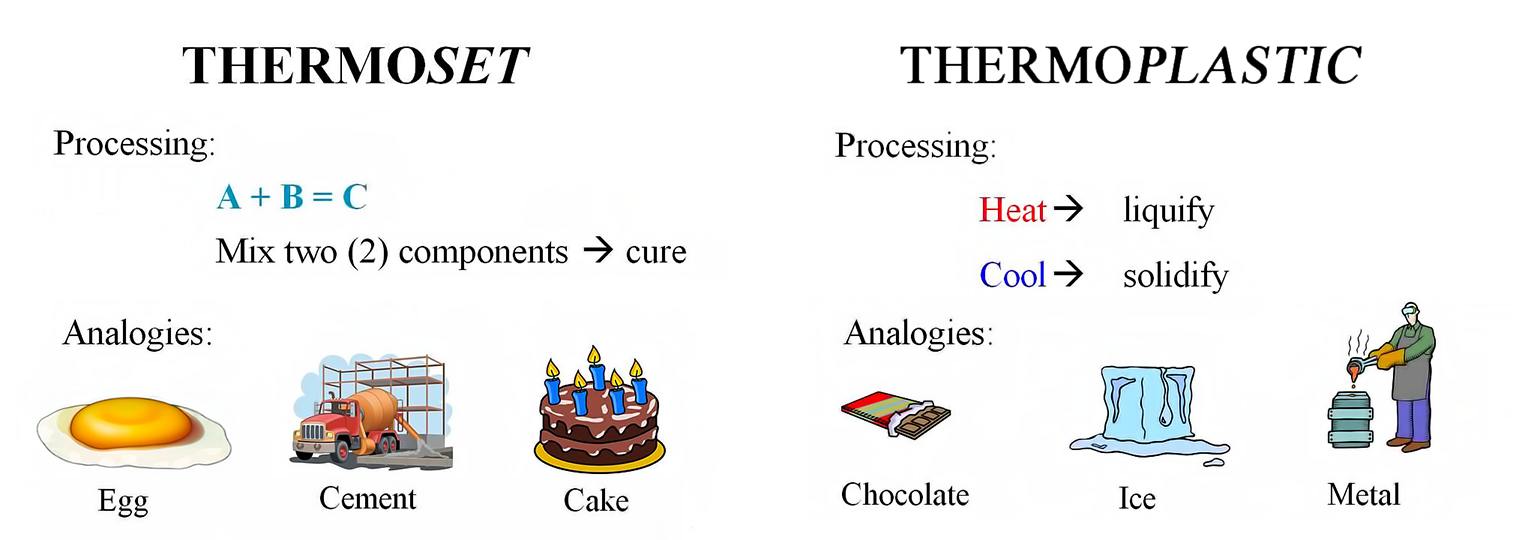
Q. What is the difference between Thermoplastic and Thermoset materials?

A. Thermosets (Hapco products) begin as liquids and solidify or “polymerize” via the reaction of two or more components.  The resultant product is completely different from any of the individual components (A + B = C). Thermosets cannot be melted or liquified back to their original states, an advantage in many applications. Thermosets are typically hand-mixed/poured, or pumped through a static mixer using meter-mix dispensing equipment. They are usually associated with Liquid Molding™, compression molding, or roto molding.

Thermoplastics begin as solid materials and can be liquified and molded into particular shapes by heating them to elevated temperatures. They solidify when cooled. These materials are associated with injection molding, thermoforming, and vacuum forming. The melted thermoplastic is injected into a mold or formed around a pattern, which is then cooled down, solidified, and ejected. Unlike thermosets, they can be recycled, re-melted, and reused.

difference between thermoset plastic vs thermoplastic

Click Here to Read More

Q. How can temperature affect polyurethanes and epoxies?

A. Temperature’s Impact on Thermoset Polymers

Temperature significantly influences thermoset polymers like epoxies, polyurethanes, and hybrid polymers.

  • Cold temperatures increase viscosity and slow down the reaction or cross-linking process.
  • Higher temperatures decrease viscosity and accelerate the reaction.

A general rule is that for every 10°C (18°F) change, the reaction rate is affected by a factor of 2. For instance, the speed doubles if the temperature rises from 25°C to 35°C. Increasing the temperature to 45°C quadruples the initial cure rate, reducing the time the user has to pour the resin. The opposite is true in colder conditions.

While these guidelines are useful, they are not absolute. Other factors like humidity and mass also impact polymers.

Storage Temperature Control:

  • The ideal storage temperature is between 18-27°C, with 22°C optimal.
  • Temperature of molds, resins, etc., should be maintained at 22-25°C for at least 12 hours before use.

Best Practices:

  • Materials or molds should never be stored on the floor, as temperature can vary by 5-7°C compared to table height.
  • Molds should be placed at table height or higher.
  • Due to their thermal insulation properties, silicone or Hapflex molds take about 12 hours to change temperature throughout. Hapcast molds are thermally conductive and reach stable temperatures in 3-6 hours.
  • Part-A and Part-B materials may crystallize in cold conditions (above 32°F). This can appear as milky discoloration or solid crystals. To reverse crystallization and avoid curing issues, apply heat (refer to product information).

Always Be Mindful of Temperature!

Click Here to Read More

Q. What is the difference between units, kits, and bulk packaging?

A. Kits: 2 partially filled cans, which when mixed together yield the volume of the larger can. i.e. – 1-gallon kit when mixed equals approximately 1 gallon. The user is able to mix the product in the can. Kits are packaged in paint can type containers.

Units: The higher ratio of the 2 components is full (usually Part-A). The correct amount of the other component is supplied. Units are almost a bulk/kit without a mixing container. Units for most materials are packaged in convenient, resealable screw top containers. If you ordered a 1-gallon unit with a 1:1 mix ratio, you would receive 1 gallon of Part-A and 1 gallon of Part B. In this case a 1-gallon unit would contain 2 gallons of material.

Bulk: Each container is full having no regard for the mixing ratio. Part A and Part B can be purchased seperately at different times.

Q. What is the difference between vacuum degassing and pressurizing?

A. Vacuum de-gassing expands the air trapped during mixing or pouring, causing the bubbles to grow, rise to the surface, and in most cases, release. After a period of time the amount of trapped air decreases. The material’s viscosity and surface tension will determine how easily the air will escape. Certain materials appear to bubble indefinitely until the vacuum pump is turned off. In order to maximize the vacuum’s potential for air removal, the pump must be capable of pulling 29.6 inHg.
When placed under pressure, any air bubbles entrapped from the mixing and pouring process shrink to the point where they are no longer visible. Pressure ranging from 60-80 psi significantly reduces the chances of visible air bubbles. For pressure to be effective, the liquid thermoset material must remain under pressure until it has reached its gel time, otherwise the bubbles may expand once the pressure is relieved.

Q. Is one method preferred over the other?

A. One method really isn’t preferred over the other. Whether you choose to use vacuum or pressure depends on the application, your capabilites, and budget. In fact, we often recommend vacuum degassing your product after hand mixing, pouring into the mold, and then using pressure to make sure all parts of the mold are filled. When using dispensing equipment, there is no air introduced during mixing. That doesn’t mean air cannot be introduced while shooting into your mold, especially with many thin walls, sharp corners, or intricate details.

If you find yourself in a situation where you need a bubble-free part (e.g., using a plaster mold or a large quantity of expensive material), it’s best to play it safe and employ both methods. Suppose neither option is in your budget and you need a void-free surface. We recommend using low-viscosity materials, mixing slowly and thoroughly, and brushing a thin coat onto the mold or pattern’s surface. Using a hair dryer while brushing the thin coat will help to ease surface tension and reduce bubbles.

Click Here to Read More

Q. What is post curing? Is it Necessary?

A. Post curing is the process of exposing a part or mold to elevated temperatures to speed up the curing process and to maximize some of the material’s physical properties. This is usally done after the material has cured at room temperature for at least 12 hours. In general, thermoset materials will achieve full cure over a period of 7-10 days.  After a full cure is achieved at room temperature, post curing will have no effect on the material’s properties.

Post curing will expedite the cross-linking process and properly align the polymer’s molecules. Much like tempering steel, post curing thermosets can increase physical properties (e.g., tensile strength, flexural strength, and heat distortion temperature) above what the material would normally achieve at room temperature. Generally speaking, rigid materials are post cured at 175F for 8-24 hours and flexible materials at 140F for 8-24 hrs. Be aware that post cure temperatures vary for different materials. Please review the Material Handling & Safety Notes supplied with your specific Hapco products, or contact Hapco’s Technical Support Staff for more information.

An oven is best for applying uniform heating; however, we recommend not using the one in your kitchen. Applying too much heat to some materials may result in dangerous fumes being emitted or a material may melt, ruining your oven. Digital, vented lab ovens are ideal for post-curing parts and molds; however, this can also be done in an X-Series Molding Chamber. During elevated temperatures, thin-walled parts may bubble or deform. Keeping them in the mold or using a fixture during post-cure is recommended. Make sure that anything you place in an oven can take the heat.

Q. Are Hapco Materials RoHS Compliant?

While the majority of Hapco resins are RoHS compliant, recent additions to the hazardous substances list have precluded certain products. For specific information regarding the compliance of certain products, please contact us.

Q. What is RoHS?

The European Union set forth the RoHS (Restriction of Hazardous Substances) Directive to establish environmental guidelines and legislation to reduce the presence of six (6) materials deemed hazardous to the environment. To comply, products entering the EU must not have a homogeneous presence of these materials above the following levels by weight percentage:

  • Lead (Pb) < 0.1%
  • Mercury (Hg) < 0.1%
  • Cadmium (Cd) < 0.01%
  • Hexavalent Chromium (CrVI) < 0.1%
  • Polybrominated Biphenyls (PBB) < 0.1%
  • Polybrominated Diphenyl Esters (PBDE) < 0.1%

If you require a material certification for a specific Hapco product please contact our customer service department.

Q. Can I get a free liquid sample of one of your products for testing?

A. Hapco does not supply free liquid samples of products; however, we supply cured samples of most of our formulations. The cured samples can give you a better idea of product differences and help identify the right material based on color, stiffness, and machinability. If you need to test a material’s compatibility with your application, quart units are available for purchase.

If you would like to receive cured samples or literature on any of our products, please get in touch with our technical support staff and we will help you find the right product for your application.

NOTE: Cured samples have not been post-cured and are not for testing purposes.

Q. Are Steralloy products FDA approved?

A. The simple answer is no, as the FDA has never approved uncured resins. The FDA requires the submission of the final product made up of all its components. It is the customer’s responsibility to have their final product submitted and approved from the FDA for its particular use. Hapco’s Filterbond and Steralloy products have been successfully submitted and approved many times, but the process of submission and approval must be followed by the customer. Hapco’s Steralloy and Filterbond product lines are manufactured with raw materials that, when processed according to Hapco’s guidelines, result in components that are potentially FDA approvable.

Q. What is the difference between a Flame Retardant and a UL certified material?

A. The Underwriters Laboratory(UL) is an independent product safety certification organization that evaluates products, components, materials and systems for compliance to specific requirements. When a Hapco datasheet indicates that an individual product is available in flame retardant(FR), it does not necessarily mean the product is certified by the Underwriters Laboratory. Hapco conducts its FR testing according to the same procedures developed by UL to categorize a product as flame retardant. In this case the test method is known as 94 V. The letter “V” indicates that the sample is held vertically over the flame during the test. The last digit after the “V” is either a 0, 1, or 2 based on the results of the test.

V-0
Vertical Burn
Burning stops within 10 seconds after two applications of ten seconds each of a flame to a test bar. No flaming drips are allowed.
V-1
Vertical Burn
Burning stops within 60 seconds after two applications of ten seconds each of a flame to a test bar. No flaming drips are allowed.
V-2
Vertical Burn
Burning stops within 60 seconds after two applications of ten seconds each of a flame to a test bar. Flaming drips are allowed.

The following sequence depicts the 94 V test as it is conducted in Hapco’s lab. With the test sample suspended vertically, the technician moves the flame directly under the sample for ten seconds and then removes it. This is repeated once more when the sample self extinguishes. The times are then recorded and averaged. Depending on the results, the material is given one of three ratings as explained in the chart above.

94V Test Hapco

Although Hapco has many products that will pass with a V-0 rating, those products have not necessarily been sent to UL for an official rating and cannot be marked with their logo. If you would like more information on our flame retardant materials, please contact a Hapco Representative.